SKU:

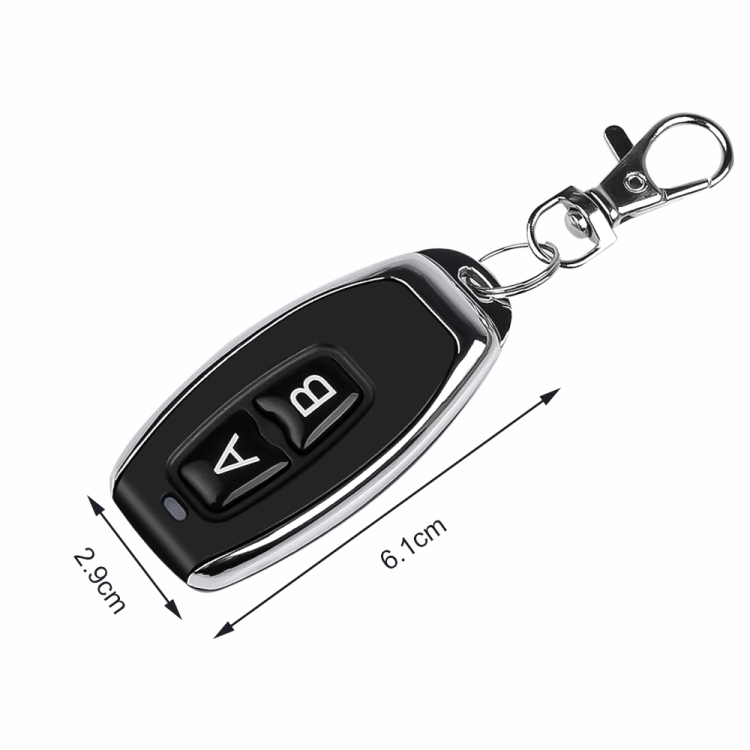
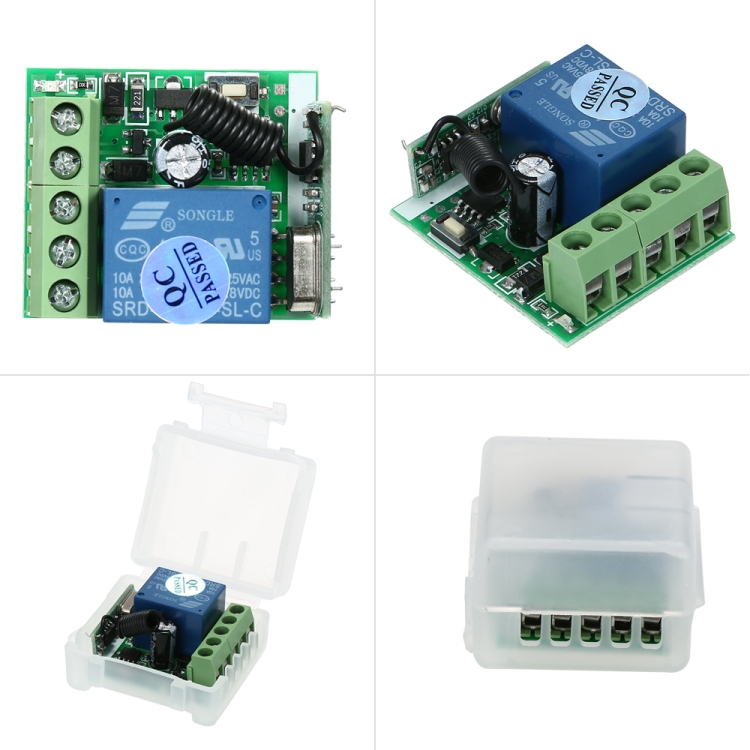
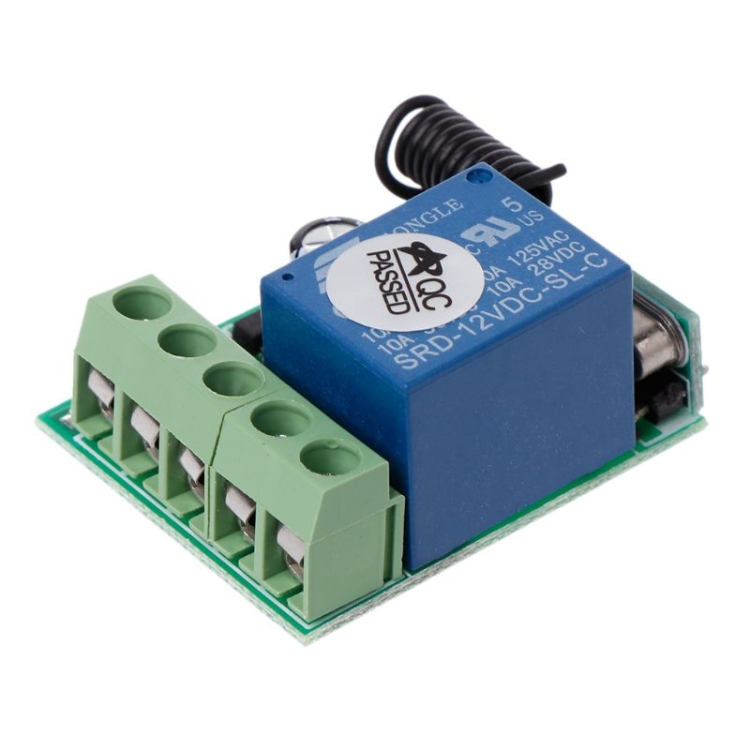
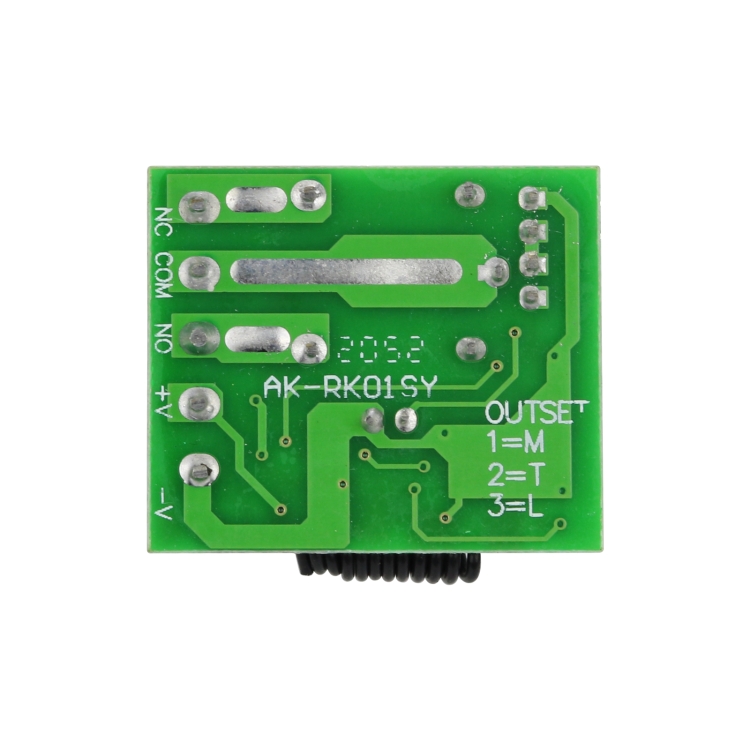
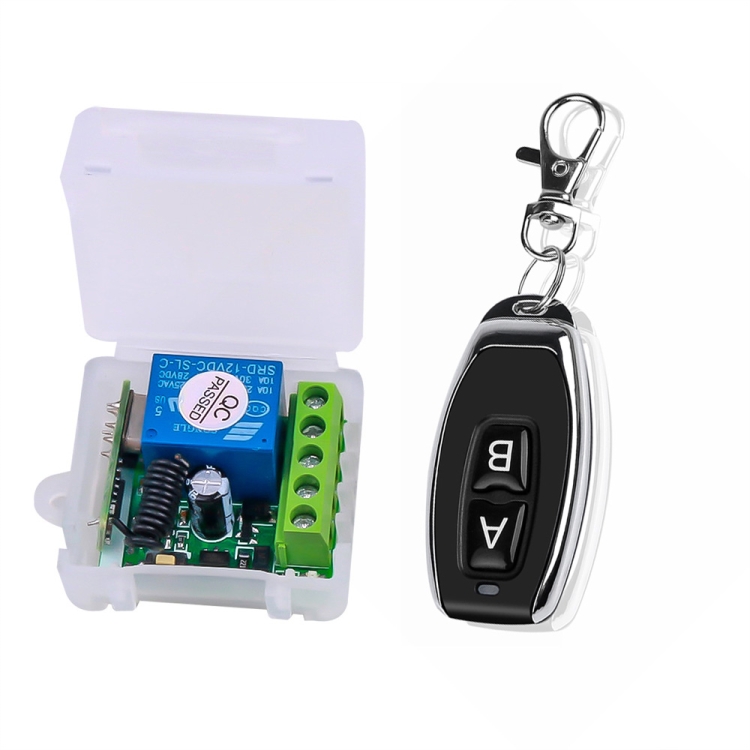
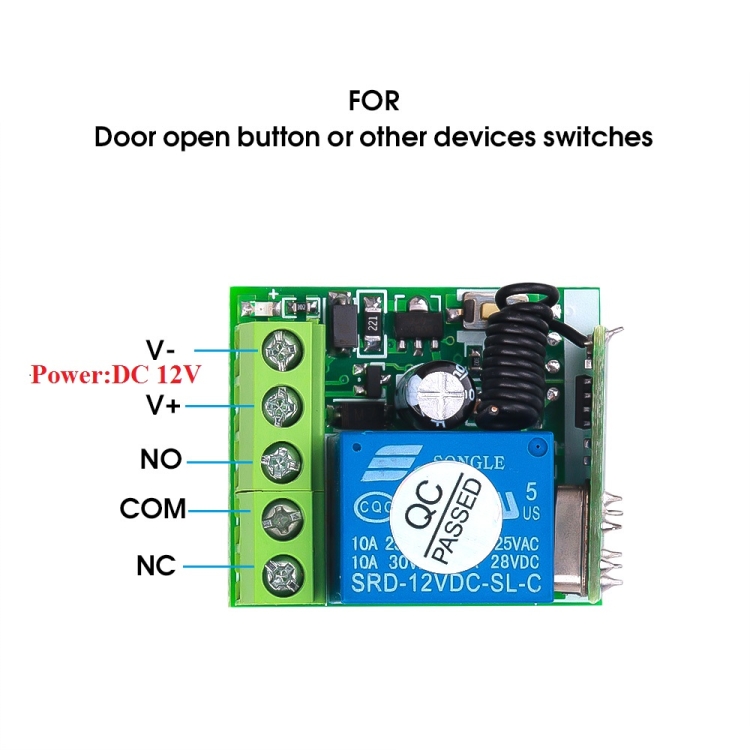
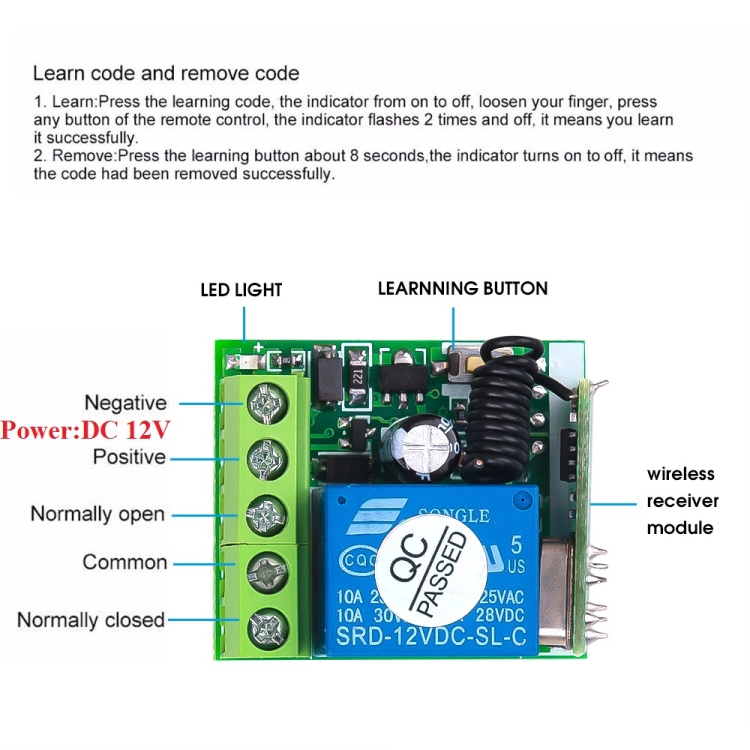
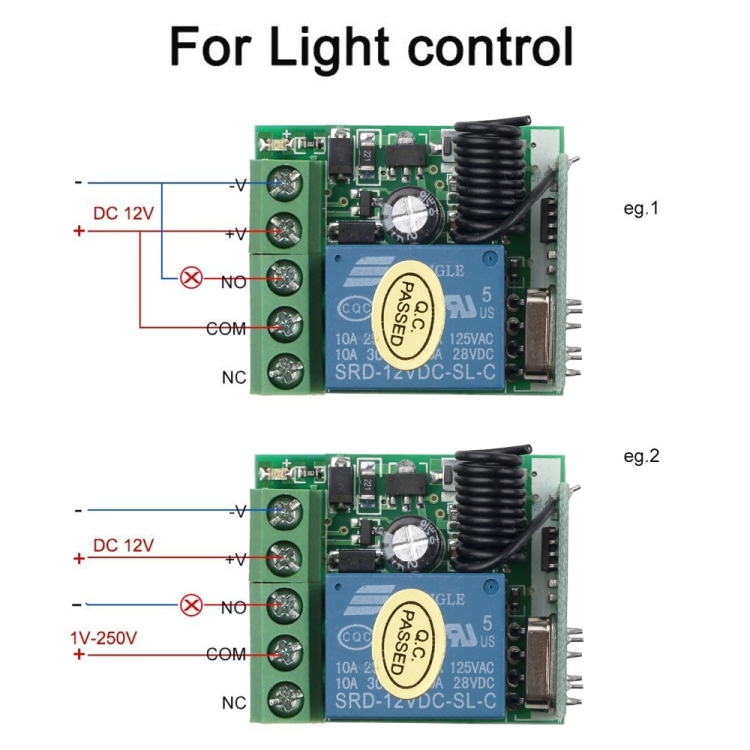
DC12V 1CH RF Remote Control Switch / 10A Relay / 433MHZ Switch Receiver
12V 10A 单路学习码遥控开关 433MHZ 开关接收器
条码:6922222568288
HSCode:74198099
批量修改原始型号
采购:JiaWang  编辑:Liangzhaoyun  产品经理:Maura

Product Features
1. Output relay switching capability: Capable of controlling loads with voltages up to 250V. Requires a 12V power supply. 2. Small Size: The circuit board measures only 35x30x17mm.
3. User-Adjustable Operating Mode: Self-locking, interlocking, inching, and time-delay modes can be adjusted via pin short-circuit caps.
4. Learning Pairing: You can learn to pair with any remote controller with the same frequency (don't worry if you lose your remote during use; simply buy a new one and learn the code without having to replace the entire set, significantly saving costs).

Technical Parameters
1. Operating Voltage: DC 12V (3V/6V/9V/24V available on request)
2. Quiescent Current: Less than or equal to 10mA
3. Operating Temperature: -40 degrees Celsius to +80 degrees Celsius
4. Receiver Sensitivity: More than or equal to -95dB
5. Operating Frequency: Commonly 315MHz, 433.92MHz (other frequencies available on request)
6. Output Current: Less than or equal to 10A
7. Operating Mode: Inching, Self-Lock, Interlock, Delay (Adjustable)
8. Output Mode: Contact Output (AC and DC controllable)

Applications
This product uses an intelligent microprocessor control system and is suitable for garage door control, lighting control, remote curtain control, access control systems, and various motor control systems. It features a compact size, easy installation, and safe and reliable operation.

Learn How to Pair Code
1. Inching Learning Method:
Press the pairing button on the control panel once. The LED indicator will flash once. Then, press the button on the remote control to be paired. The LED indicator on the control panel will flash several times, indicating successful pairing.
2. Self-locking Learning Method:
Press the pairing button on the control panel twice. The LED indicator will flash twice. Wait until the LED indicator turns off. Then, press the button on the remote control to be paired. The LED indicator on the control panel will flash several times, indicating successful pairing.
3. Interlocking Learning Method:
Press the pairing button on the control panel three times. The LED indicator will flash three times. After the LED indicator turns off, press the A and B buttons on the remote control to be paired. The LED indicator on the control panel will flash several times, indicating successful pairing. 4. 5-Second Delay Learning Method:
Press the control panel pairing button 4 times in a row. The LED indicator will flash 4 times. After the LED indicator goes off, press the button on the remote control you want to pair. The control panel LED indicator will flash several times, indicating successful pairing.
5. 10-Second Delay Learning Method:
Press the control panel pairing button 5 times in a row. The LED indicator will flash 5 times. After the LED indicator goes off, press the button on the remote control you want to pair. The control panel LED indicator will flash several times, indicating successful pairing.
6. 15-Second Delay Learning Method:
Press the control panel pairing button 6 times in a row. The LED indicator will flash 6 times. After the LED indicator goes off, press the button on the remote control you want to pair. The control panel LED indicator will flash several times, indicating successful pairing.

Precautions
1. Do not operate with power on. Always turn off the power before operating. Only power on after confirming that everything is working properly.
2. If the remote control battery voltage is low, please replace the batteries immediately. (A low battery voltage in the remote control generally reduces the control range.) 3. When using wireless electronic products, avoid strong interference sources such as metal covers, large electronic devices, and electromagnetic fields to prevent the remote control from being too close to the receiver or causing it to malfunction.
4. Do not use this electronic product improperly. Improper use can reduce product performance and lifespan, and in severe cases, damage the product and pose a safety hazard.
5. The delay time setting is automatically set when entering learning mode. The delay time setting is linked to the number of times the learning button is pressed. Please pay special attention to this.


产品特点
1. 输出继电器开关量:可控制250V以下不同电压的负载。供电必须是12V。
2. 小体积:体积小,线路板尺寸仅35x30x17mm。
3. 工作方式用户随意调节:通过插针短路冒调节自锁、互锁、点动,延时的工作方式。
4. 学习型对码:可任意学习对码同频率遥控器(使用过程中遥控器丢了也不用担心,直接买个遥控器学习一下即可,不用整套更换,大大节约了用户的成本)。

技术参数
1. 工作电压:DC12V(3V/6V/9V/24V可定做)
2. 静态工作电流:小于等于10mA
3. 工作温度:-40摄氏度至+80摄氏度
4. 接收灵敏度:大于等于-95dB
5. 工作频率:常用315MHZ,433.92MHZ(其他可以定做)
6. 输出电流:小于等于10A
7. 工作方式:点动、自锁、互锁,延时(可调)
8. 输出方式:触点输出(可控制交、直流)

适用范围
本产品采用智能微处理器控制,可适用于车库门控制、灯光控制、遥控窗帘、门禁系统及各种电机控制系统等。小体积,具有安装简便,使用安全可靠等特点。

学习对码操作方法
1. 点动学习方法:
按1次控制板对码按键,LED指示灯伴随闪烁1次,接着按下需要对码的遥控器按键,控制板LED指示灯连续闪烁数次,表示对码成功。
2. 自锁学习方法:
连续按2次控制板对码按键,LED指示灯伴随闪烁2次,等LED指示灯熄灭,然后按下需要对码的遥控器按键,控制板LED指示灯连续闪烁数次,表示对码成功。
3. 互锁学习方法:
连续按3次控制板对码按键,LED指示灯伴随闪烁3次,等LED指示灯熄灭后,然后按下需要对码的遥控器A按键和B按键,控制板LED指示灯连续闪烁数次,表示对码成功。
4. 延时5秒学习方法:
连续按4次控制板对码按键,LED指示灯伴随闪烁4次,等LED指示灯熄灭后,然后按下需要对码的遥控器按键,控制板LED指示灯连续闪烁数次,表示对码成功。
5. 延时10秒学习方法:
连续按5次控制板对码按键,LED指示灯伴随闪烁5次,等LED指示灯熄灭后,然后按下需要对码的遥控器按键,控制板LED指示灯连续闪烁数次,表示对码成功。
6. 延时15秒学习方法:
连续按6次控制板对码按键,LED指示灯伴随闪烁6次,等LED指示灯熄灭后,然后按下需要对码的遥控器按键,控制板LED指示灯连续闪烁数次,表示对码成功。

注意事项
1. 请勿带电操作,应关闭电源进行操作,检测确定无误后通电使用。
2. 当遥控器电压不足时请及时跟换电池(遥控器电池电压不足时,一般遥控距离变近)。
3. 使用无线电子产品时应注意避开金属面罩,大型电子设备,电磁场等有很强的干扰源,避免遥控器与接收距离短或者无法正常工作。
4. 切勿非正常使用此电子产品。非正常使用会降低产品性能与寿命,严重时会损坏产品也会给您的安全带来隐患。
5. 延时的时间设定,是在进入学习模式时,就已经自动设定。延时的时间设定是与按下学习键的次数相关联的。请特别留意。


代码:

Specification:
Package weight
One package Weight 0.07kgs / 0.15lb
One Package Size 7.0cm * 6.0cm * 3.0cm / 2.76inch * 2.36inch * 1.18inch
Qty per Carton 100
Carton Weight 5.5kgs / 12.13lb
Carton Size 36cm * 25cm * 10cm / 14.17inch * 9.84inch * 3.94inch

代码: